New Fuel System (lots of pix - not dialup friendly)
- Thread starter Fubar
- Start date
You are using an out of date browser. It may not display this or other websites correctly.
You should upgrade or use an alternative browser.
You should upgrade or use an alternative browser.
BlackICE
GT Owner
My guess is the main reason for the new fuel rails are to add a fitting for the return fuel line.
The stock fuel rails are constructed like a tin box (I don't mean that to be derogatory). They are made with a flat sheet of metal (stainless I think) that is folded and welded together at the seams. The stock fuel rails walls are actually very thin. This helps the rails absorb some of the pressure pulses caused by the injectors opening and closing. I am sure their design is deliberate and functional. However, when we tried to add a fitting for the return line, the thin metal was subjected to excessive heat and it created pin hole leaks around the injectors and seams. Thus the need for custom rails with all the fittings made to order on one seamless piece. You could purchase "off the shelf" fuel rails for a turbo application because you have room at the ends to attach whatever fittings you need. However, with the supercharger still in the way, entry/exit points became more complicated.
Finally have everything bolted on.
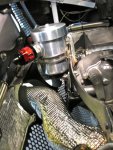
Cool pressure gauge on the new fuel rail. Probably not necessary but I just thought it would look like something C. Shelby would do (the man was obsessed with fuel pressure).

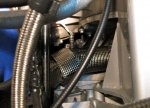
This picture shows why custom rails were necessary on a SC application. Also gives the first glimpse of the braided stainless steel, kevlar lines incased in a heat/fire retardant sheath. (I don't like to be on fire)

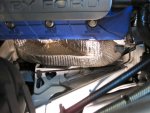
Good "lay of the land" shot. Thanks for the help with the finishing touches Dave

A nice view of the new rail, pressure gauge, trick ass connectors and halon nozzle (Again, I do not like to be on fire... it is a furry person's natural enemy)

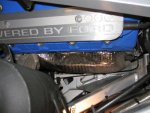
And lastly, a shot thru the back glass. As you can see it really is not that dramatic of a change in the engine bay. The blow-by ports will get most of the attention from the untrained eye.

The old girl fired right up once the system was primed. No drama except that the ECU wanted to know where her fuel pumps went. We will tune tomorrow (sense the Aggie wont get off the dyno for me tonight)
Cool pressure gauge on the new fuel rail. Probably not necessary but I just thought it would look like something C. Shelby would do (the man was obsessed with fuel pressure).
This picture shows why custom rails were necessary on a SC application. Also gives the first glimpse of the braided stainless steel, kevlar lines incased in a heat/fire retardant sheath. (I don't like to be on fire)
Good "lay of the land" shot. Thanks for the help with the finishing touches Dave
A nice view of the new rail, pressure gauge, trick ass connectors and halon nozzle (Again, I do not like to be on fire... it is a furry person's natural enemy)
And lastly, a shot thru the back glass. As you can see it really is not that dramatic of a change in the engine bay. The blow-by ports will get most of the attention from the untrained eye.
The old girl fired right up once the system was primed. No drama except that the ECU wanted to know where her fuel pumps went. We will tune tomorrow (sense the Aggie wont get off the dyno for me tonight)
BlackICE
GT Owner
I'm still on the dyno just finished getting the cats off and putting the cold air on!!! Strapping her back down now
- Feb 22, 2006
- 370
FYI, the blow-by worked like a charm. When we disassemble the intake (after The Mile saga) it was completely clean and free from any oil residue. The catch can did not get any oil on the trip to south Texas which means means it's not going to be a big problem keeping it empty over time. I suspect oil in the intake plagues the supercharger guys more as a significant vacuum is created that likely sucks the oil out of the crank case. However, if the turbo cars are not rerouting the blow-by vents then unnecessary pressure is being added to the crank case and that's not good either. At least one of my projects worked 100% as intended on this trip.
At least one of my projects worked 100% as intended on this trip.
The fuel pump/rails didn't?
The fuel pump/rails didn't?
We thought we could get away without a heat shield but the pump will vapor lock after extended exposure the engine heat. It's a simple fix, a couple Inconel heat shields and it should work 100% as intended.
We thought we could get away without a heat shield but the pump will vapor lock after extended exposure the engine heat. It's a simple fix, a couple Inconel heat shields and it should work 100% as intended.
where is that quick video of you talking about vapor lock?
where is that quick video of you talking about vapor lock?
[video=youtube;GYT9u1aRkUI]http://www.youtube.com/watch?v=GYT9u1aRkUI[/video]
I'm sure my post about the heat issues is around here (see: Epic Texas Mile Adventure thread). However in an effort to make this thread a completed chapter on the fuel system saga, I am going to add a little more info.
Issues with radiant heat plagued this setup. If the motor was allowed to warm-up to full temp (more than just getting the coolant hot). Enough heat could be transferred from the headers to the fuel pump to cause the fuel inside of the pump to turn to vapor ("Vapor Lock"). This scenario typically occurred when the car stopped and the fuel was no longer in motion. However, I did experience the situation twice under very 'spirited' driving conditions. My tuner suggested we add a heat shield to the entire exhaust system and try to move as much heat out the back as possible. I felt like the fuel plumbing needed to be changed so that the electric pump could properly flush out the filter and mechanical pump upon startup.
The solution we went with, both:
1) We added an Inconel heat shield to the entire exhaust. It's amazing stuff, I can now reach down and flat-palm the frame that is 6 inches from the headers right after a spirited drive. Fish also added a phenolic heat spacer to separate the fuel pump from the heat in the oil pump.
Attachments
Last edited:
2) Shawn and I disagreed about how to handle the electric pump. I wanted it to pump directly thru the mechanical pump and Shawn felt that at peak fuel consumption that might actually create an obstacle for fuel flow. He wanted the electric pump the pull from a pre-mechanical pump point and push to a post-mechanical pump point. He felt like the front of the mechanical pump could get a good bite of fuel this way and everything else would work itself out. Experience has taught me to go with Shawn when there is any doubt. This is also the method that Kinsler suggested. It was also very important to be that the system be almost undetectable to the novice user. So basically it needs to operate as OEM. This presented a challenge, how do you make the electric fuel pump come on before you start the car (but not stay on while driving) and let it run long enough to do some good... make it as OEM? Our solution was to activate it through the GTs keyed ignition system and the have the start button deactivate it. No real pictures to see here. Only want to mention that if I do get the engine truly hot (and I haven't had a good 100*+ weather here yet) then I will turn the key on and give it 5 seconds before I pop the start button.
Everything is working perfect now. The fuel pressure stay within +/- 1 lbs of target pressure on the dyno (whereas before it would fluctuate 10-15lbs.
Everything is working perfect now. The fuel pressure stay within +/- 1 lbs of target pressure on the dyno (whereas before it would fluctuate 10-15lbs.
Last edited:


