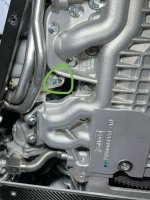
Oil change procedure


Special K

GT Owner
Mark IV Lifetime
Aug 23, 2016
1,781
Franklinton, LA
I’m wrapping up an oil change and thought to share the procedure. I’m not sure if it’s on here or not. All you need is a lift, a good 76mm 14 flute oil filter wrench, and some patience!

I’ve got the procedure down to about an hour’s time and a little under $250 for the parts.

A few pointers to add:

The filter can be difficult to get off. Until I can find a better wrench, I’ve need channel locks to get it broken loose.

The procedure doesn’t require it, but if you hold the accelerator pedal to the floor when cranking you can build oil pressure prior to starting the engine.

O’reilly auto has been my best local source for Motorcraft 5w50 ($10.49/qt)

The filter is a dealer only item.

303-01 Engine
2019 Ford GT
General Procedures
Procedure revision date: 01/2/2020

Engine Oil Draining and Filling​

Special Tool(s) / General Equipment
Oil Drain Equipment
Materials
NameSpecification
Motorcraft® Threadlock and Sealer
TA-25-B
-
Castrol® EDGE® Supercar 5W-50WSS-M2C931-C
Draining
NOTE:
If any debris is present in the engine oil, replace the auxiliary oil cooler. Refer to Auxiliary Oil Cooler in this section.
  1. With the vehicle in NEUTRAL, position it on a hoist using the front and mid lift points.
    Refer to: Jacking and Lifting - Overview (100-02 Jacking and Lifting, Description and Operation).
  2. Remove the bolts and the engine underbody cover.
imagen2.dll
  1. Lower the vehicle and position the hoist using the front and rear lift points and raise the vehicle.
    Refer to: Jacking and Lifting - Overview (100-02 Jacking and Lifting, Description and Operation).
  2. NOTICE: For a regular maintenance oil change, do NOT loosen or remove the plug located at the front right of the oil pan. This plug is used to bleed the oil cooling circuit. Removal of this plug without correctly bleeding the oil cooling circuit can cause air to enter the oil cooling circuit, resulting in damage to the engine.
    1. Remove the oil pan drain plug in the left front corner of the oil pan and drain the oil from the oil pan.
      Use the General Equipment: Oil Drain Equipment
    2. Remove the oil tank drain plug near the back of the oil pump and drain the oil from the oil tank.
      Use the General Equipment: Oil Drain Equipment
    3. Install the oil pan and oil tank drain plugs.
      Torque: 18 lb.ft (24 Nm)
imagen2.dll
  1. NOTE: Use a Lisle® 61570 - 76 mm - 14 flutes end cap wrench.
    NOTE: Place a rag over the cross bar when removing the oil filter to catch drips from the oil filter.
    Using a oil filter end cap wrench, remove and discard the engine oil filter.
imagen2.dll
Filling
    1. Prefill a new oil filter with clean engine oil.
      Material: Castrol® EDGE® Supercar 5W-50 (WSS-M2C931-C)
    2. Lubricate the oil filter gasket with clean engine oil.
imagen2.dll
    • Install a new oil filter and tighten in 2 stages.
    • Stage 1: Install to initial gasket contact.
    • Stage 2: Tighten 3/4 to 1 turn.
imagen2.dll
  1. NOTE: The total volume of oil required to properly refill the engine oil system can vary depending on the volume of oil drained from the system components.
    Add 10.0 quarts (9.5 liters) of clean engine oil to the oil tank as an initial fill.
    Material: Castrol® EDGE® Supercar 5W-50 (WSS-M2C931-C)
imagen2.dll
    • Start the engine and idle until the coolant temperature reaches 190 degrees Fahrenheit (88 degrees Celsius).
    • Turn engine off.
    • Wait 2 to 3 minutes.
  1. NOTICE: Do not exceed the specified engine oil system capacity of 13.7 quarts (13 liters).
    Check the oil level by screwing dipstick in until fully seated in the oil tank and add as necessary to place the level between the minimum and maximum oil level marks on the dipstick.
    Material: Castrol® EDGE® Supercar 5W-50 (WSS-M2C931-C)
imagen2.dll
  1. Lower the vehicle and position the hoist using the front and mid lift points.
    Refer to: Jacking and Lifting - Overview (100-02 Jacking and Lifting, Description and Operation).
  2. NOTE: Apply loctite to the bolts before installation.
    Install the engine underbody cover and the bolts.
    Material: Motorcraft® Threadlock and Sealer / TA-25-B
    Torque: 60 lb.in (6.8 Nm)
imagen2.dll
© Copyright 2021, Ford Motor Company.
 

Attachments

  • IMG_0673.jpeg
    IMG_0673.jpeg
    1.4 MB · Views: 73
  • IMG_0682.jpeg
    IMG_0682.jpeg
    1.8 MB · Views: 70
  • IMG_0683.jpeg
    IMG_0683.jpeg
    1.9 MB · Views: 70

Specracer

GT Owner
Mark IV Lifetime
Nov 28, 2005
7,165
MA
A good quality filter wrench is needed. I think I have a Lisle. I tried a generic from a parts store, did not work at all. I got mad at that one, and used our hydraulic press to turn it into a pancake, and threw it away.
 
  • Like
Reactions: Special K

Special K

GT Owner
Mark IV Lifetime
Aug 23, 2016
1,781
Franklinton, LA
A good quality filter wrench is needed. I think I have a Lisle. I tried a generic from a parts store, did not work at all. I got mad at that one, and used our hydraulic press to turn it into a pancake, and threw it away.
Agreed, I have a few different ones and they all slip. I use a big pair of channel locks to break the filter loose, then use the gear filter socket I have. Going on isn’t a problem, I’m able to achieve 3/4-1 turn past contact with the filter wrench I have.
 
  • Like
Reactions: Specracer

Kiteboarder Ken

GT Owner
Jun 25, 2020
74
Tampa Florida
Any source for the Castrol Supercar oil? Is the Motorcraft 5W-50 adequate? I don't plan on tracking anytime soon. Thanks.
 
  • Like
Reactions: Special K

Special K

GT Owner
Mark IV Lifetime
Aug 23, 2016
1,781
Franklinton, LA
Any source for the Castrol Supercar oil? Is the Motorcraft 5W-50 adequate? I don't plan on tracking anytime soon. Thanks.
Ford approves Motorcraft 5w50. I’ve been told by top techs, that unless your car is going to see severe track duty, the Motorcraft is fine. In fact, mine still looks new when draining it out.
 

Specracer

GT Owner
Mark IV Lifetime
Nov 28, 2005
7,165
MA
Also it's printed in owner's manual, that Motorcraft 5w50 is fine. Good enough for me.
 
  • Like
Reactions: Special K

PeteK

GT Owner
Mark II Lifetime
Apr 18, 2014
2,489
Kalama, Free part of WA State
I use the Motorcraft recommended stuff too. I also do oil analysis at each change with Blackstone Labs, which shows it is not depleted or contaminated. Based on that, I extended my change intervals to 10,000 miles. As most of you know, I'm now at 83Kmi and no significant increase in wear metals.
 
  • Like
Reactions: Special K

Kiteboarder Ken

GT Owner
Jun 25, 2020
74
Tampa Florida
That is good news about the Motorcraft oil. Now, this will probably start a vigorous debate but------what interval time wise, do people change their oil in a NFGT? I am going on about 18 months but only around 900 miles. It always looks fresh when I change oil in my old GT after 18 months. 2 years? 30 months? Let the lecturing begin! Thanks for the response regarding the Motorcraft, I should try and read that entire manual I suppose.
 

Special K

GT Owner
Mark IV Lifetime
Aug 23, 2016
1,781
Franklinton, LA
I have no problem stretching it out a bit. With the cars being climate controlled and the oil synthetic, I have no problem going 3 years if the mileage is low, although I drive my cars enough that they typically get changed about every year and a half.
 
  • Like
Reactions: THamonGT

STORMCAT

GT
Mark IV Lifetime
Le Mans 2010 Supporter
May 25, 2006
7,582
Ft. Lauderdale
I've tried a lot of filter sockets.. This one is the best one I've ever tried.. locks on never had it slip. It's not cheap but if you're servicing a lot of Gt's it's worth the money. Billet aluminum made in America , bought It on Amazon..
 

Attachments

  • 20210907_210700.jpg
    20210907_210700.jpg
    1.3 MB · Views: 41
  • 20210907_210722.jpg
    20210907_210722.jpg
    927.6 KB · Views: 36

Kiteboarder Ken

GT Owner
Jun 25, 2020
74
Tampa Florida
Here is a rainy day project that I did last week. I got tired of the chinese junk tools and I never saw that quality filter socket shown in the above post. I brazed three nuts on the side of this socket and sharpened up some thumb screws to tighten the socket to the filter. Only really need one to do the job as you can pierce the filter. It seals the oil in the filter so it doesn't drain out around the thumbscrews. Why wouldn't anybody manufacture one like this? Feel free to make one and send $1 royalty to me after you see how good this thing works!
 

Attachments

  • 20240303_201809 (1).jpg
    20240303_201809 (1).jpg
    1 MB · Views: 12

DakotaGT

GT Owner
Mark II Lifetime
Dec 9, 2012
1,716
Sioux Falls, South Dakota
I've tried a lot of filter sockets.. This one is the best one I've ever tried.. locks on never had it slip. It's not cheap but if you're servicing a lot of Gt's it's worth the money. Billet aluminum made in America , bought It on Amazon..

i think I’ll pick one of these up, but just to double check Brian- get the 74 mm socket, and not the 76 mm one, as the manual states? No wonder it is less prone to slippage, if it goes on there ok!
 

STORMCAT

GT
Mark IV Lifetime
Le Mans 2010 Supporter
May 25, 2006
7,582
Ft. Lauderdale
i think I’ll pick one of these up, but just to double check Brian- get the 74 mm socket, and not the 76 mm one, as the manual states? No wonder it is less prone to slippage, if it goes on there ok!
I've used theone in the picture multiple times.. sticks like glue under super high torque.. It's printed on the body. ( 74 mm)
 
Last edited:
  • Like
Reactions: DakotaGT

STORMCAT

GT
Mark IV Lifetime
Le Mans 2010 Supporter
May 25, 2006
7,582
Ft. Lauderdale
Here is a rainy day project that I did last week. I got tired of the chinese junk tools and I never saw that quality filter socket shown in the above post. I brazed three nuts on the side of this socket and sharpened up some thumb screws to tighten the socket to the filter. Only really need one to do the job as you can pierce the filter. It seals the oil in the filter so it doesn't drain out around the thumbscrews. Why wouldn't anybody manufacture one like this? Feel free to make one and send $1 royalty to me after you see how good this thing works!
Have you tried this on the new gt ? it's pretty tight / not much space in that area..
 

DakotaGT

GT Owner
Mark II Lifetime
Dec 9, 2012
1,716
Sioux Falls, South Dakota
Just changed my oil, and thought I would add a couple of things. Thanks guys, for your contributions- very helpful! Always grateful to Joe Sicoli, also, for always being there to answer my questions on GT-related things.

-I'll attach a photo to illustrate the second drain plug to remove, towards the rear of the oil pump area.
-consider putting the wing in the stowed position, for easier access to the hatch.
-if you warm up the engine first, and drain the oil thoroughly, you might consider starting with 11 quarts, and not 10, to save a bit of time. I ended up adding 12 quarts total to get it in the sweet spot on the dipstick.
-you only need to remove the one underbody tray, the third one back (right in front of the rearmost/diffuser tray).
-be ready for a sustained deluge when you pull that drain plug by the oil pump; have your drain tank/basin up as close to the drain as possible and consider holding a towel around the area between the engine and the drain tank to contain some of the oil splash. Can be a bit messy.
-it's a good time to snug all hose clamps on the turbo hoses, etc. while under there.

second drain plug by oil pump.jpeg
 
  • Like
Reactions: Sinovac

#6-GULFgt

Member
Aug 22, 2006
12
Just changed my oil, and thought I would add a couple of things. Thanks guys, for your contributions- very helpful! Always grateful to Joe Sicoli, also, for always being there to answer my questions on GT-related things.

-I'll attach a photo to illustrate the second drain plug to remove, towards the rear of the oil pump area.
-consider putting the wing in the stowed position, for easier access to the hatch.
-if you warm up the engine first, and drain the oil thoroughly, you might consider starting with 11 quarts, and not 10, to save a bit of time. I ended up adding 12 quarts total to get it in the sweet spot on the dipstick.
-you only need to remove the one underbody tray, the third one back (right in front of the rearmost/diffuser tray).
-be ready for a sustained deluge when you pull that drain plug by the oil pump; have your drain tank/basin up as close to the drain as possible and consider holding a towel around the area between the engine and the drain tank to contain some of the oil splash. Can be a bit messy.
-it's a good time to snug all hose clamps on the turbo hoses, etc. while under there.

View attachment 69712
I need the part number for the drain bolt circled in the picture anyone have that?